Database
Intersect has two databases, one that stores game data (e.g. items, maps, resources, events) and another that stores all data related to player accounts.
The tables in both databases are automatically generated based on contexts. The player context and game context are defined in the following source files:
- Intersect.Server/Database/GameData/GameContext.cs
- Intersect.Server/Database/PlayerData/PlayerContext.cs
Contexts consist DBSets which end up being tables. DBSets are created from C# Classes.
The context classes also define relationships between the tables. You can learn more about that from the Entity Framework Core documentation if interested.
Database Fields
Fields are automatically created from public properties in a class much like Tables are automatically created from Classes within DBSets in a context.
If you look at the Users class in the server (Interect.Server/Database/PlayerData/User.cs) you will see fields for the user’s name, password, e-mail, etc.
Please note, Entity Framework can only handle basic types (integers, strings, blobs, and references to other classes that exist as a DBSet). Due to these limitations we mark some complex fields as [NotMapped] and then have a secondary string field that converts the complex field to JSON. For an example of this see User.Power and User.PowerJson. Notice how the PowerJson property has a column name property so it is stored in the database in the Power field.
Adding Fields
In order to add a field to the database create a new public property in a class that is stored within Entity Framework. In this example I am going to add a field for each User that tracks their last used IP address.
I added the following property to the User class:
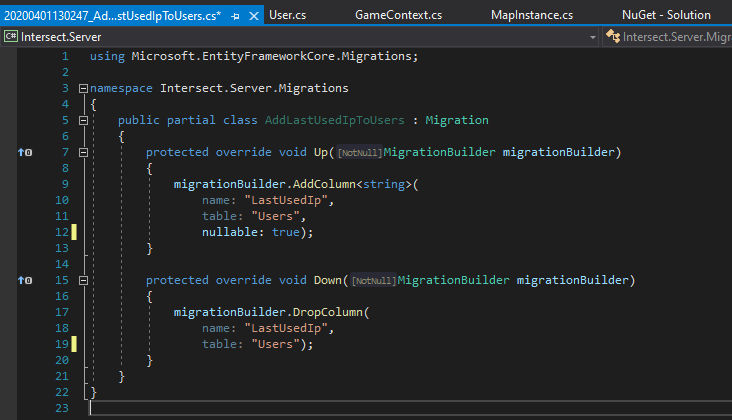
public string LastUsedIp { get; set; }Creating a Migration
After making changes to Entity Framework classes you will need to create a migration. In order to create the migration there are several setup steps:
-
Set your startup project to
Intersect.Server, and the build type toNoFody.
-
Now build your server. Building with the NoFody configuration will generate a bunch of required DLLs.
-
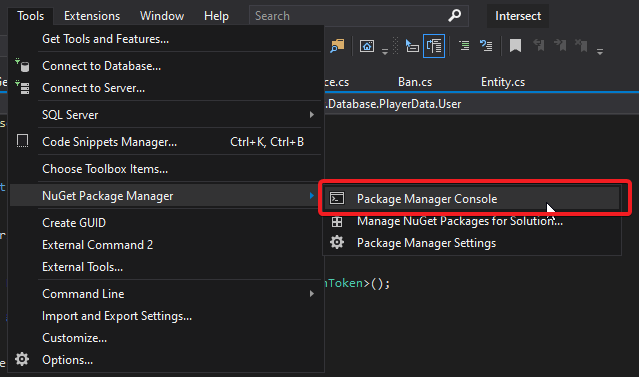
In VS open a NuGet Package Manager Console. (Tools -> NuGet Package Manager -> Package Manager Console).
-
Within the package manager console set your default project to
Intersect.Server.
Now you’re ready to generate the migration files. Enter the following command into the package manager console:
Add-Migration -Context [ContextHere] [InsertMigrationNameHere]Replace [ContextHere] with either GameContext or PlayerContext depending on which database you modified.
Replace [InsertMigrationNameHere] with a short identifier of what the migration is for.
For example I added a LastUsedId property to the Users class. In this case I would use the following command:
Add-Migration -Context PlayerContext AddingLastUsedIpToUsersYour migration should appear as a new source code file. Go ahead and save it.
Now that we’re done change the solution configuration from NoFody back to Debug and run your server.
You will be greeted with the migration prompt.
Migration Limitations
Due to (current) limitations in Sqlite fields cannot be renamed or removed. We have a few fields that we keep around that are not in use due to these limitations. It is expected that this functionality will someday be available.
Migrations are one-way
Unfortunately migrations are one-way due to limitations above with Sqlite. If users want to uninstall source modifications that alter the database they will have to use external tools to remove the database fields or revert to a backup before the modification was installed.